Let's recall what happens when we get footage from a CCTV system: the camera saw a person, a car made it into the frame, the license plate seems to be there. Hooray! We can go straight after the bad guy! But then you open the recording — and the familiar set of headaches begins: it's dark, it's noisy, the headlights burn out half the image, the person takes up a couple dozen pixels, and the car has turned into a smeared blob.
The first urge is to look for an "enhance" button. I've dreamed of such a button myself more than once — after all, they show it in the movies… But alas, forensic processing works differently: we don't "paint" a good frame, we don't generate one in a clever AI editor; we carefully pull out of the source what the camera actually managed to record.
Below I've collected eight typical problems from my own practice with CCTV, dashcams, body-worn cameras and assorted other recording equipment. For each one: the cause, the exact sequence of steps, and the limit beyond which processing starts doing harm.
What will we be using?
It's simple: in real life, specialized and expensive tools usually aren't at hand at the moment you need them. So everything here is free and, for now, still widely available on the internet:
- GIMP 3.2
A counterpart to the familiar Photoshop. We'll use it to work with individual images or with a set of frames taken from a video.
- Shutter Encoder 20
A program for transcoding video without re-compression, unnecessary artifacts or visual junk. It will also help you trim a video, transcode it without loss of quality and "play around" with the basic parameters.
- DaVinci Resolve 21
A seriously cool video editor. If you're into video editing, DaVinci is surely familiar to you. Its free version will help us work with levels, track motion in shaky footage and tune a whole heap of other parameters peculiar to moving pictures.
- VideoCleaner 5.8
A "multitool" created by a forensics enthusiast specifically for forensic video examination. Its only downside is its leisurely pace and its appetite for the resources of the computer it runs on.
Before doing anything at all, remember: DO NOT TOUCH THE ORIGINAL!
Yes, I'm a stickler for this, but it's better to be safe than sorry. The source file must remain unchanged. Work ONLY WITH A COPY and record exactly what you did. I always set up my workspace like this: I create a set of folders so as not to get tangled up in the different versions of the files under examination:
- ORIGINAL — the source file
- WORK — working copies
- EXPORT — processed versions
- STILLS — individual frames pulled from the video
- LOGS — the program, its version, the sequence of operations and the key settings, so that all of it can later be reproduced somewhere else.
Getting started
Let's prepare the recording for examination. Most likely we won't need the entire hour-long exported clip. So we'll cut out the piece we need without losing quality, and at the same time record the metadata and other technical information that may come in handy later:
- Open Shutter Encoder and click Choose files.
- Add the working copy of the video.
- Right-click the file and open File(s) information.
- Note down the codec, resolution, frame rate, scan type and duration.
- If you only need a short episode: Choose function → Cut without re-encoding, set the start and end points and start processing.
- When transcoding, enable Advanced Features → Preserve metadata.
And now let's start dealing with the problems…
Problem No. 1. A very dark recording
At night the sensor simply doesn't get enough light. The camera amplifies the signal, and the noise gets amplified along with it. If the illumination is weak or the object is far away, the dark areas contain little useful information. So our goal is to pull up the shadows and midtones, not just to turn the whole frame gray.
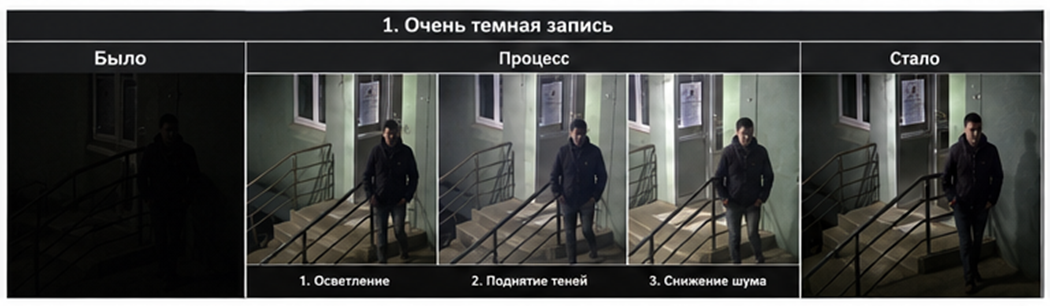
Step-by-step procedure

Practical limit: light → noise → sharpening. If you start with sharpening, you get very impressive but useless digital noise.
Problem No. 2. Heavy glare, headlights or backlighting
The brightness of headlights and of a dark street can differ so much that the camera can't fit the scene into its dynamic range. The bright areas get "pinned" at the maximum, while the dark ones "sink" into black. This often looks like a white mask around the headlights or a window.
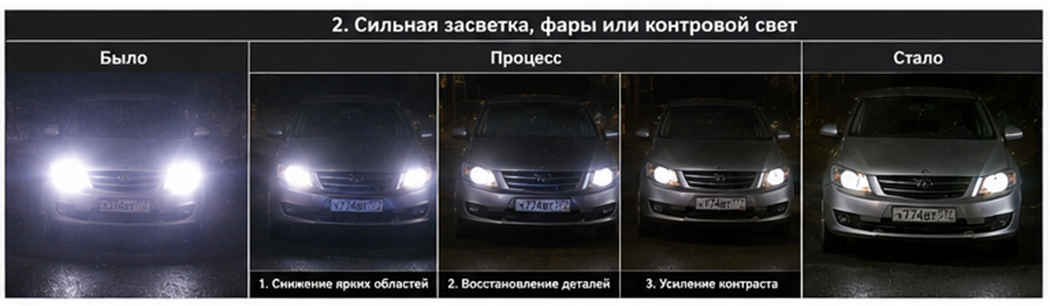
Step-by-step procedure
- In DaVinci Resolve, open Color → Scopes → Waveform.
- Check whether the bright areas are hitting the upper limit.
- Reduce Gain.
- Reduce Highlights.
- Then raise Gamma/Shadows slightly.
- Create a separate Node.
- Use a Power Window to select the car, license plate, face or clothing.
- Adjust the selected area separately.
- For a moving object, use the Tracker on the Power Window.
Practical limit: if overexposure has turned the area of interest into a solid white blob, you won't be able to pull any digits out of it — the original recording never preserved them.
Problem No. 3. Digital noise and heavy CCTV compression
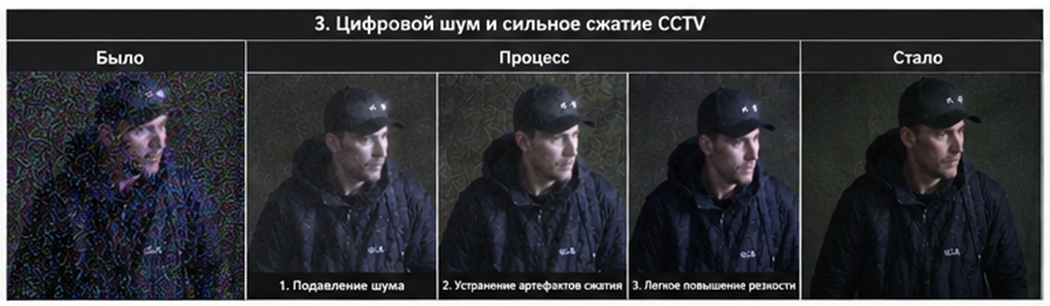
In the dark, the camera amplifies the sensor's weak signal. Then the DVR compresses the stream further to save space. As a result we see colored speckles, compression blocks and "mush" along fine edges.
Step-by-step procedure
- Load the working fragment into Shutter Encoder.
- Choose a working codec.
- Open Corrections.
- Enable Noise suppression.
- Start with the minimum strength.
- For aliasing, such as noticeable "staircase" edges, try Details.
- For bands in smooth gradients, use Reduce banding.
- Compare fine details before and after processing.
Practical limit: noise reduction has to be stopped before the edges of characters, the folds of clothing and facial features disappear. A "plastic" face is already a sign that the filter has gone too far.
Problem No. 4. Camera shake
A body-worn camera, an eyewitness's phone or a dashcam can move as a whole. The object sometimes remains relatively sharp but jumps around the frame. Stabilization tries to compensate for the movement of the camera itself, not the blur within a single frame.
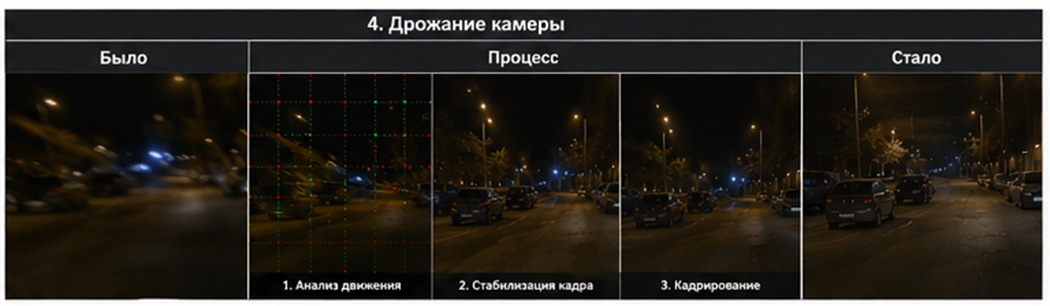
Step-by-step procedure
- In DaVinci Resolve, go to Edit.
- Select the clip.
- Open the Inspector.
- Find Stabilization.
- Start with the least aggressive stabilization.
- Click Stabilize.
- Review the entire fragment.
- Check the frame edges and the moving objects.
- If geometric distortions appear, reduce Strength/Smoothing.
- After stabilization, pick the best individual frames.
Practical limit: camera shake and motion blur are different defects. Stabilization can align the frames, but it won't bring back detail that was smeared during the exposure.
Problem No. 5. Motion blur: the moving object is blurred
Let's look at the blur problem from the other side, when it's not the camera that moves but the object itself. If a car or a person is moving fast and the camera's exposure time is long, the object manages to shift while a single frame is being recorded. The result is directional blur. Sharpening can accentuate the edges a little, but it cannot bring back a shape that has been completely lost.
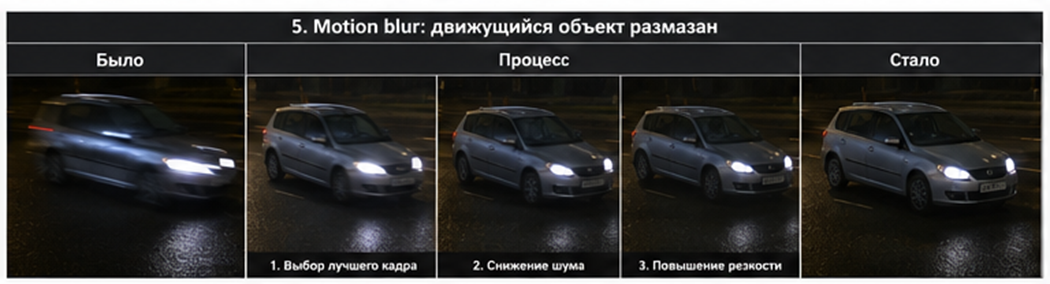
Step-by-step procedure
- Don't sharpen the entire clip at once.
- Look through several frames before and after the moment of interest.
- Find the frame with the least blur.
- Extract it.
- Open it in GIMP.
- Filters → Enhance → Sharpen (Unsharp Mask).
- Increase Amount gradually.
- Keep Radius small.
- Stop as soon as light and dark halos appear.
Practical limit: if after sharpening "A8" turns into "48", that's not restoration. That's already an interpretation of the filter's artifacts.
Problem No. 6. "Combing" on moving objects
To this day we periodically have to deal with analog CCTV systems. These include old video cameras that write an analog signal to a digital video recorder, as well as archival material that often arrives with the same problem. The problem arises because old systems record interlaced video: a single frame is made up of two fields captured at different moments. As long as the object stands still, everything looks decent. Once it starts moving, horizontal jagged teeth appear.
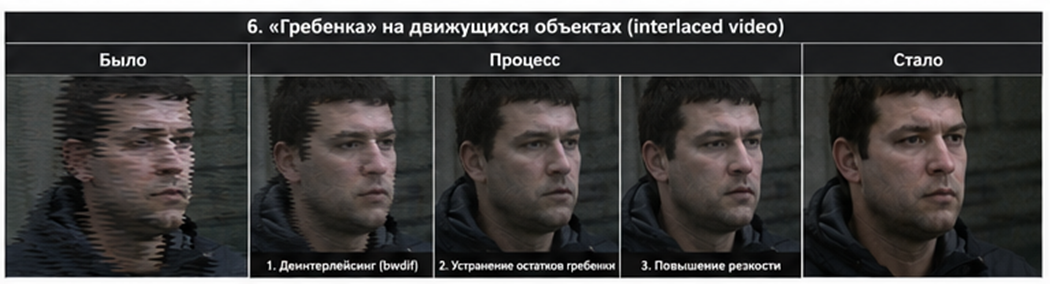
Step-by-step procedure
- Load the video into Shutter Encoder.
- Select the required output format.
- Open Advanced Features.
- Enable Force deinterlacing.
- Start with bwdif.
- Step through the motion frame by frame.
- If the fields are being interpreted incorrectly, try Force fields inversion.
Practical limit: after deinterlacing, look first of all at the moving edges: the face, hands, legs, the outline of the car. That is where the defect is most visible.
Problem No. 7. The object takes up a very small part of the frame
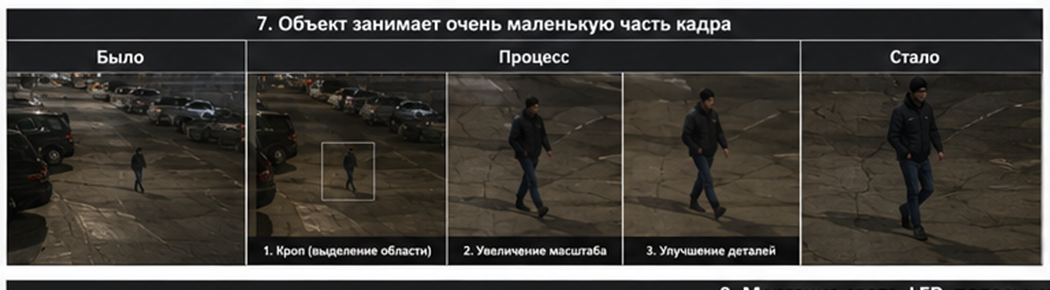
Let me say straight away that it won't work like in the movies here. If a face is 25×30 pixels, a tenfold enlargement will make it easier to look at, but it won't turn the original 750 pixels into new real detail. Scaling is a way of looking at an image, not a way of rewriting the sensor's history.
Step-by-step procedure
- First find the best source frame.
- In Shutter Encoder or GIMP, crop around the area of interest.
- Only after cropping, scale up.
- In GIMP, use Image → Scale Image.
- After enlarging, apply Levels/Curves if needed.
- At the very end — moderate sharpening.
Practical limit: the correct order is: best frame → crop → enlarge, not the other way around.
Problem No. 8. The camera views the object at a steep angle
Here's the classic case: a license plate or a sign shot almost from the side turns into a narrow trapezoid. The far part of the object occupies far fewer pixels than the near part. Perspective correction can restore a convenient geometry, but it stretches the data that is already there; it doesn't create any new strokes.
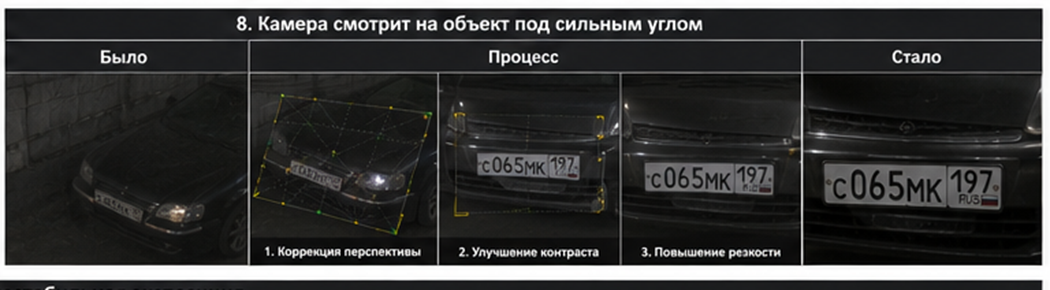
Step-by-step procedure
- In VideoCleaner, go to View.
- Use the four-corner perspective correction.
- Place the corner points on the edges of the license plate, sign, document or other flat surface.
- Transform the trapezoid into a rectangle.
- After correcting the geometry, apply Curves/Contrast.
- Only then add a little sharpening.
Practical limit: with very strong perspective, the far characters may remain hard to make out even after straightening. The most realistic outcome is a plate that's easier to read, not a suddenly perfectly sharp plate.
We've dealt with the main problems. Finally, let's run through a few practical questions that come up most often.
How to improve the visibility of a license plate in a video?
The convenient thing about video is that the plate is often present not in one frame but in dozens of adjacent frames. In one, a character is smeared; in the next it's better; and a frame later it's obscured by a glare spot. That's why reading a plate should always be based on a series of frames, not on the single "prettiest" result.
- Find 5–20 adjacent frames containing the plate.
- Remove interlacing if it is present.
- Stabilize the video if the camera is moving.
- Select the 2–5 sharpest real frames.
- Crop out the plate itself.
- Correct the perspective.
- Reduce the noise.
- Apply Levels/Curves according to the color histogram.
- Sharpen moderately.
- Compare the characters across several frames.
How to improve the image of a face?
For a face I use a different sequence: stabilization → best frame → noise → light → local contrast → moderate sharpening. The task is not to make the person better-looking, but to bring out stable features: head shape, hairline, ears, glasses, facial hair, clothing and build.
For fans of neural-network "enhancers", let me say it straight away: generative "face restoration" is dangerous in evidentiary analysis — the model can create a convincing detail that the camera never recorded.
When should you stop?
You can almost always push a slider further, but past a certain point you're no longer improving the material — you're amplifying artifacts. Stop when the following begin to appear:
- light halos around objects
- double edges
- artificial bands
- "plastic" faces
- new dots and lines
- sharply accentuated compression blocks
- characters that change with a small change in filter strength
In place of an afterword
Always keep in mind: good processing helps you get a better look at what the camera actually recorded, not at what some miracle AI program has convincingly painted in — something that no longer has anything to do with the source data.
Sometimes the best professional result sounds very simple: "There is not enough detail for a confident determination." And that is far more useful than a beautiful mistake.
Good luck in your work!